I love grid spots. They allow you to really control your light in a way that nothing else can… I know, I hear you saying, “what about snoots?” I generally only use a snoot if I need to highlight a detail in a scene, and use a grid spot for larger light. Works for me… do what works for you.


Details on what I’m using, how I made it, and some other ways to use it after the jump.
There are now some products coming out to address using grids with speedlights, but they weren’t available when I made my adapter. I had a set of 7″ grip spots because I couldn’t deal with hot gluing lots of black drinking straws together (as seen on Strobist). I wanted an easy way to mount them to my speedlight, so I made an adapter to mount a 7″ strobe reflector to my speedlight.
Here’s what you’ll need:
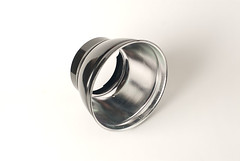
A 7″ strobe reflector
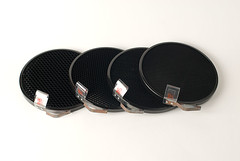
A set of 7″ grids:
And here is what you’re going to make:
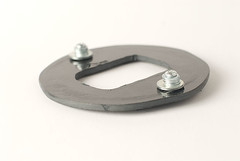
There really isn’t too much to this. It’s just a scrap of ABS plastic. Look up plastic in your yellow pages; you’ll be surprised when you find the plastic places near you. I got a chunk big enough to make four or five of these for about $5 (and the place was just a few miles from my house… I had no idea they were there).
You can also use plywood if you’re more inclined to that.
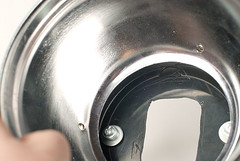
When you get your reflector, measure the diameter of the back; this will be the diameter of the circle you need to cut out of your plastic. Cut that out. I got mine roughed out with a hacksaw and used a Dremel to smooth it out. It doesn’t need to be perfect.
Once you have that, drill a hole in the middle and start Dremeling (Dremelling?) the space for your speedlight. Have it handy so you can test it out. You want it to be a little bit tight so you can just friction mount it. I have velcro all over my speedlight, so friction mounting works really well. If you don’t have velcro (and how can you not?), you could add a rubber band or something squishy to aid in the mounting.
Next, measure the distance from the edge for the two mounting slots. This will be where you put your screws and washers.

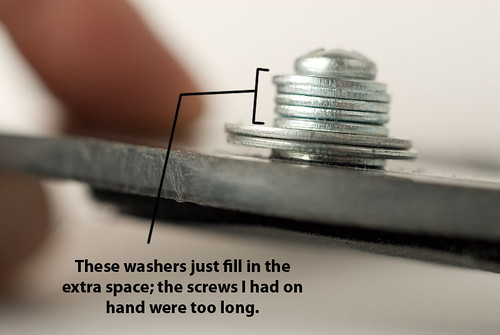
Here’s a detail of the washer stack. If you plan ahead and buy the right length screws, you’ll need fewer washers. If you’re just going by the seat of your pants (like I was), you’ll just make it work with what you’ve got laying around.
And now you’re ready to put it together!
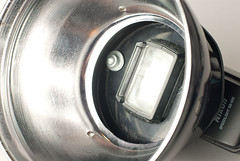
Here’s what it looks like when you stick the flash in there:
As you can see, there’s plenty of extra space if you wanted to add a bolt or two to mount a small dome and go for a quasi-mini beauty dish. I haven’t done that yet…
Here’s another look:
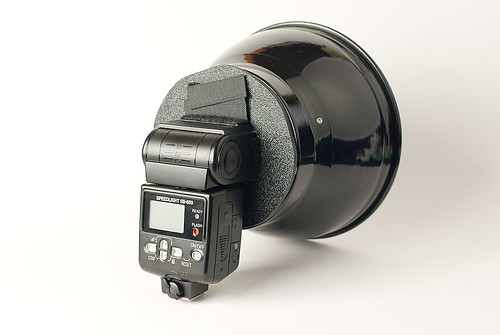
You can see my strips of velcro on the adapter. I put them there as a safety net, but the friction mounting is strong enough that I rarely use them anymore.
So… what are you waiting for? Mount a grid in there!

Ta da!
This is how I’ve been using this for nearly a year now. When making photos like the two at the start of this post, I just pop the reflector and grid on and go to town.
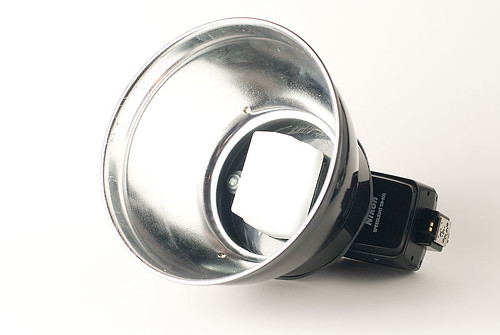
Lately, though, I’ve been experimenting with just using the reflector alone, or using it in really close range. There was a post on strobist today that explains some of this, so I don’t have to! It’s a great read: go check it out. (that post is what finally drove me to blog about this…)
When doing something really close like that, you need to make your speedlight act a little more like a strobe. The reflector on a strobe is around a bare bulb, so… to make the speedlight more like that, all we need to do is stick a stofen (or your favorite DIY equivalent) on there and go to town:
Experiment with this with and without the grids… it opens up plenty of new possibilities!
And, with sincere apologies to both Peter Yang and Admiral William Fallon, here is my knockoff photo.

I know this doesn’t have the snap of the original; I left the power down a little bit on purpose for two reasons:
1.) I wanted to make it clear that a speedlight could get a “softish” result, and
2.) Do you really want to see my pores under any stronger light?
So, that’s that! I hope you enjoyed this post, and hit me with questions in the comments!
April 10th, 2008 at 12:17 pm
many thanks for the show n’ tell. i’ve been using the novatron snoot grids, als david tejada, gaffered (gaffered?) to my speedlights, but like this idea better.
April 10th, 2008 at 4:56 pm
Awesome!
This is exactly what I was waiting for, I think this is huge.
Very grateful for sharing this.
Kudos,
Andy
April 10th, 2008 at 5:31 pm
Insteresting. How strong connection? Didnt reflector overweight flash?
April 10th, 2008 at 6:04 pm
The reflector isn’t all that heavy. It will stay on the flash even with a grid mounted and the flash pointing straight down.
A lot of it comes down to how tight a fit it is; have your flash handy when you’re making the hole for it so you don’t accidentally make the hole too big. It doesn’t have to be a perfect fit, but if the top and bottom sides of the hole have a bit of arc to them, they’ll hold the flash quite securely.
I was a little concerned about that at first, which is why I added the velcro: I thought I would need it to hold everything together. I really almost never use it anymore.
It really works quite well.
Thanks for the comments, and if you have more questions, keep ’em coming!
April 10th, 2008 at 6:18 pm
Thanks for the instructions – just what I was looking for. Please would you post a url to the reflector? I’ve found different one’s at B+H and Adorama so I’m not sure which is right.
I think it’s the Speedotron one that fits the M11 head?
Cheers
Nas
April 10th, 2008 at 7:09 pm
This is the one I used (linked from Calumet because it’s a special order from B&H):
http://www.calumetphoto.com/item/SB1207/
April 10th, 2008 at 9:17 pm
Thank you. Is that the same as this one at Adorama? (They’re cheaper for the grids):
http://www.adorama.com/SZ24219.html
December 27th, 2008 at 9:48 pm
It occurred to me while on a shoot yesterday that lining a gary fong in tin foil and velcroing a grid to it might work fast and cheap. I’ll try it and let you know.
October 9th, 2009 at 3:00 pm
Im doing something quite similair … just using a Bowens replacement 7″ reflector head with matching gridspot set ($26) plus a Interfit Strobies Flex Mount ($14) .. should make for a great quick gridspot attachment once I epoxy the 2 together.
January 16th, 2010 at 7:08 pm
Just to say a big thankyou for this little gem
Im in new york in 8 weeks and my route is
already in memory to B&H.
Cheers Alan
February 9th, 2010 at 9:52 am
i was trying to figure ou thow to do this with a coffee can. this is so rad. Thanks!
April 6th, 2011 at 2:58 pm
Just wondering if you get more light output or just more specularity with this setup. I made one from a shop light clip light and modified it to fit in/on a sb800 stofen but did not see a difference. I like what you have here using a existing reflector and then just modifying the mount.
May 18th, 2012 at 9:01 am
This is great…love it! I think you can make a small beauty dish too this way … paint the inside of a reflector white (not sure what paint to use to get the right color temp though?) and combine it with a StoFen dome and voila, a small beauty dish. Yes? Maybe it’s not shallow enough using a std 7″ reflector to approximate a beauty dish though – don’t know. This grid adaptation is great though. Thanks.
May 18th, 2012 at 10:46 am
I never ended up trying the little beauty dish thing, although I would suspect these reflectors wouldn’t be the best choice for it; like you said, they’re pretty deep.